
.webp?width=1921&height=622&name=usecase-banner%20(1).webp)
Introduction to Testing
It is essential first to understand what testing is. Testing is 3 step process that looks something like this: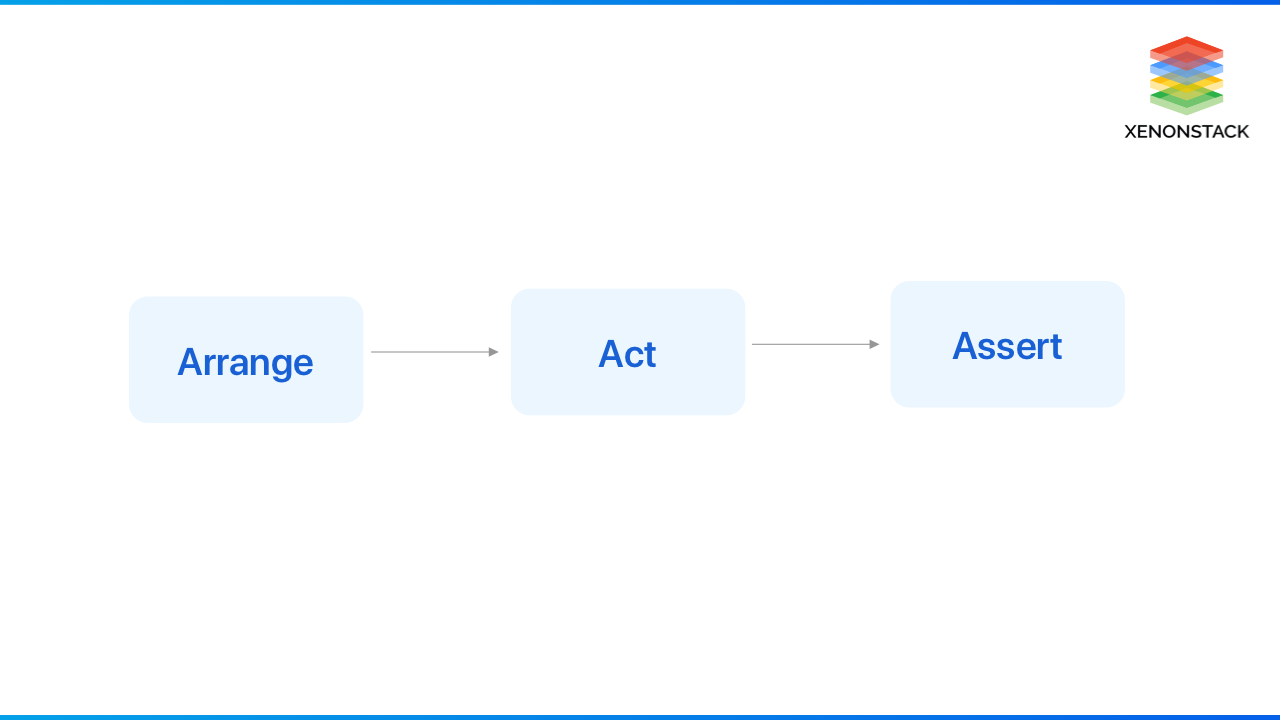
Fig:- Testing Step Process
The first step is to Arrange. This includes arranging the step in a specific original state. Like there would be a button or header on a page. I am designing and considering coming under the Arrange state.
The second step is Act. It includes clicking on the page, entering the input field, etc. Like, click on a button on the page, or toggle a header.
AssertJ is Java library that provides an interface for writing assertions. Click to explore about, AssertJ and HamCrest Assertion Frameworks
The third step is Assert. It is the primary step of the testing. It considers the hypothesis of the app's state, like when clicked on the button, how it will behave, where it will redirect, etc. If the test passes, it is working fine, and if the test fails, we need to check and fix the bug.
We can test react components using any test runner environment. Unlike react components, the test doesn’t run on the browser and needs any test runner.
React provides the Jest framework, which acts as a testing environment and runs the test. That is why we don’t need to export describe it to write the tests. We will know about it in detail in the coming section.
Why Testing is imporatant?
Testing is a great discipline that can lead to an 80 % reduction in bug density. It also has other important benefits like it:
- Improves your code architecture and maintainability.
- It gives quick feedback on testing whether or not your changes worked.
- It gives excellent safety while adding new features or refactoring existing features.
What is Test Driven Development?
That’s a term used in programming practice where you write the before. Let’s look into it with an example if we are going to create a function. We are doing it for the expected output, so we will make a test with output type like there is a function of calculating two numbers, then it should give a number output as expected. If not, the test will fail, and let us know the error.
If we use TDD, this will let you reduce your functions to a small part of logic, and you can make sure on your code and detect errors in the dev process before the integration.
What are the Do and Don't do for Unit Testing in React?
The Do and Don't do for Unit testing in React ar explained below:
Do for Unit Testing in React
We test the application's functionality and check if it is working fine or not. We check the functionality that the app is working fine for the end-users. We check how it will behave with the end-users. Writing the unit test cases and covering all the major scenarios gives the developer the confidence that it will work fine in production.
Writing the test cases makes our application more robust and less error-prone. If testing is done correctly from the developer’s end, it is more likely to work fine in each intended case and lead to fewer bugs.
Don't do Unit Testing in React
The test doesn’t include testing the implementation details the end-user doesn’t care about. We shouldn’t test the variable and function names. Like the constant variable name or the function name changes, then the test will fail, but the end-user doesn’t care about what function name we have given.
Suppose there is function name ‘handleClick’ and we tested the functionality using this name, it worked fine. But if we change the function name to on Submit, the test will fail, but the functionality would work as expected. Also, the end-user doesn’t care about it. Our aim should be to test the functionality to work fine as intended on clicking the button. So, changing variable names and function names is not our responsibility to test.
Also, we should not test third-party libraries; it is our responsibility to work correctly to integrate with our certain functionality. We should do the basic check before using it in our application that it is adequately tested by the developers and is production-ready to use. Or we can check the library's source code, whether it includes the test cases or not. After verifying all these details, we can confidently use the third-party libraries with our application and will not cause any issues in the production and development environment.
Software testingplays a vital role in the life cycle of software and Test Driven Development. Click to explore about, Test Driven Development
What are the Types of Unit Testing and comparison?
In React, the testing can be done in three ways using:-
- React testing Library
- Jest
- Enzyme
We will read more about each method in detail with the implementation.
About React Testing Library
The react testing library is a lightweight package created by Kent C. Dodds. It is built on top of react-dom and react-dom/test-utils. It also encourages the best testing practices. The primary guiding principle of reacting testing library is:-
The closer your tests are to how your program is used, the more trust you'll have in it.
This library doesn’t deal with the rendered nodes. It directly deals with actual nodes. The library provides querying the DOM nodes like finding elements, buttons, etc. Also, it provides more accessibility and provides such an environment where we can test how the user will use the application.
This library is not:-
- A test runner or framework.
- It can be used with any specific framework.
Now, let’s go deep dive into the implementation of the React testing library:-
React Testing Library Implementation
It can be installed using:-
npm install --save-dev @testing-library/react
The react testing library needs to be implemented using Jest. It can be run without using Jest, but it’s not the preferred way of doing it.
So, using the React testing library with Jest is implemented below.
Jest Implementation
About Jest
Jest is a JavaScript Testing Framework focusing on simple ways, and it works with the project using: Babel, Node, TypeScript, React, Vue, and more. It can be installed using npm or Yarn.
Jest fits with better usability known as test runner (runner focused on running or debugging a specific test or test-suite, while jest is in-process current test-cases every time we change it). It creates snapshots when we run our file. It works as:-
Fig:- Snapshots creation
Configuration of Jest
To get our tests up and to run, we can setup jest by installing on dev dependencies:
npm install --save-dev jest
In package.json, add test to jest.
{ ..."scripts": {"start": "react-app-start","test": "jest"},...}
Now we create a test suite file. Here we created it as cfs.test.js.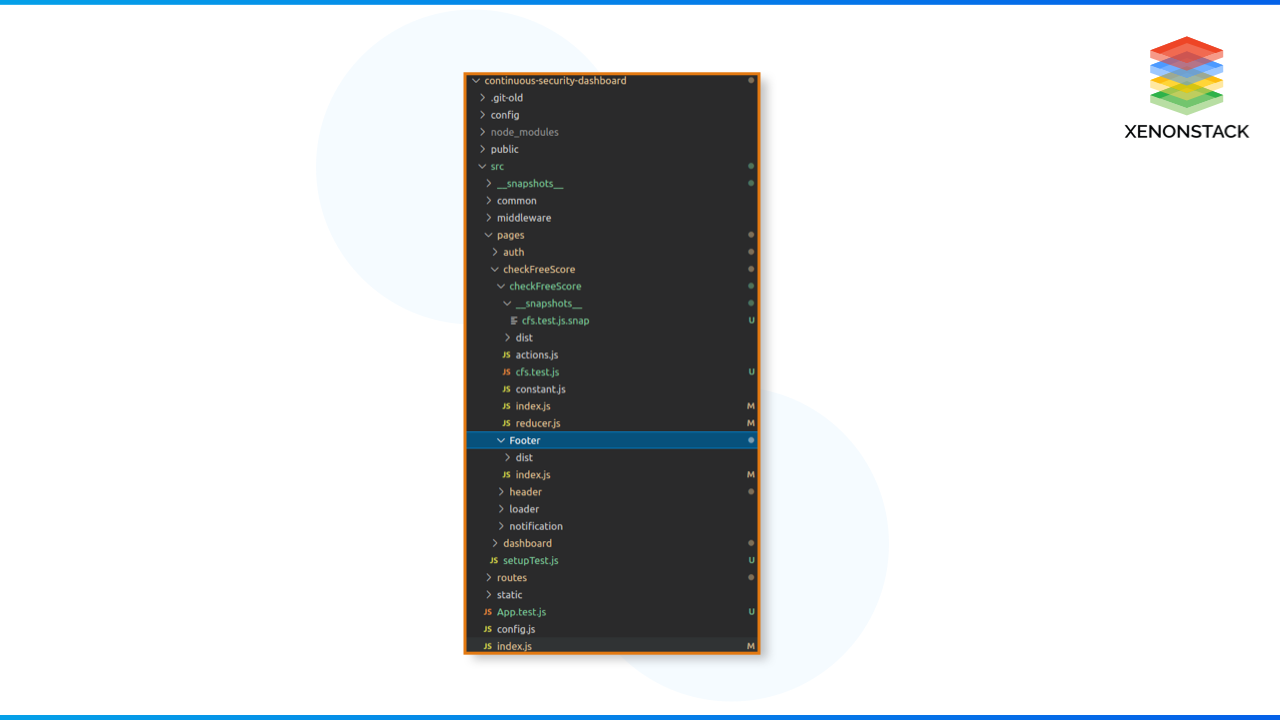
In Mention below, we are using a component of reacting named Footer. And placed it into cfs.test.js. We can use enzyme along with jest for further functionality for testing components, which is mentioned below. Then in the package.json file, we need to add the following configuration to the jest file:-
"jest": {"setupFilesAfterEnv": ["<rootDir>src / pages / checkFreeScore / checkFreeScore /cfs.test.js"],"snapshotSerializers": ["enzyme-to-json / serializer"]},
We run the test case using the command npm run test or npm test, which does the following in the package.json file:-
"test": "jest",
Implementation of Jest
Here we are going with a single UI section component= < Footer / > where the test scenario will depend on rendering and functions that will be any result.
After running any test, it creates snapshots of it as mentioned below:
// Jest Snapshot v1, https://goo.gl/fbAQLP
exports [`BaseButton renders correctly 1`] = `<Context Consumer><Component /></ContextConsumer>`;
exports [`Footer section renders correctly 1`] = `<ContextConsumer><Component /></Context Consumer>`;
exports [`matches snapshot 1`] = `<ContextConsumer><Component /></ContextConsumer>`;
Enzyme Implementation
About Enzyme
The enzyme is a javascript testing utility for React that makes it easier to assert, manipulate and traverse the components. It was created by Airbnb and later transferred to an independent Organization. It was developed around December 2015. It provides manageable methods to find elements, render components and interact with the elements.
Jest and Enzyme
Both Jest and Enzyme are meant to test the react applications. Jest can be used with any other Javascript framework, but Enzyme is meant to run on react only.
Jest can be used without Enzyme, and snapshots can be created and tested perfectly fine. But the Enzyme adds additional functionality to it.
An enzyme can also be used without Jest, but we need any other test runner paired with it.
So, In our application, we have used:-
Jest:- Jest as a test runner, assertion library, and mocking library.
Enzyme:- To provide additional testing utilities to interact with elements.
Setup
We need to create the setupTest.js file. It will contain all the settings and configurations for the enzyme test setup.
The setupTest.js file would look like this:
import Enzyme, { shallow, render } from 'enzyme';import Adapter from 'enzyme-adapter-react-16';import element Dataset Polyfill from "element-dataset";// React 16 Enzyme adapterEnzyme.configure({ adapter: new Adapter() });// Make Enzyme functions available in all test files without importingglobal.shallow = shallow;global.render = render;
element Dataset Polyfill();
const localStorageMock = {getItem: jest.fn(),setItem: jest.fn(),clear: jest.fn()};global.sessionStorage = jest.genMockFunction();global.sessionStorage.setItem = jest.genMockFunction();global.sessionStorage.getItem = jest.genMockFunction();global.sessionStorage.removeItem = jest.genMockFunction();global.localStorage = localStorageMock;
Then in the package.json file, we need to add the following configuration to the jest file:-
"jest": {"snapshotSerializers": ["enzyme-to-json/serializer"],"setupFiles": ["./config/setupTest.js"],}
More details of the setup and implementation can be found here:- React Unit testing and Enzyme setup.
We run the test case using the command npm run test, which does the following in the package.json file:-
"test": "jest test -- --coverage -- updateSnapshot",
Implementation of Enzyme
I have picked the login component for testing, which looks something like this:-
The reason for choosing Enzyme testing for the login component was, it is using the mapStateToProps, without and connect method for passing the data in the component. The component using these methods can only be tested by Enzyme.
Before starting any test case, we need to create a test functionality like login.test.js. The file should be created under the folder name _test_. This is the standard convention for the folder name for testing.
Implementation of Login Testing

Scenarios to Test in the Login Component
The cases would be:-
- Should render the login component correctly.
- Should render the form.
- Has helmet tag(used in the component)
- Has h1 on the page.
- Has login text for users.
- Has forgotten password text and redirects to forgot password page on click.
- Has logo on the page.
- Has login button present.
- The login button should show an error message when the fields are empty and clicked.
- Has email field and state changes on click.
- Has password field and state changes on click.
- Should show an error message when the invalid email is clicked.
- Show call login function when correct details are provided and show loader.
- Should successfully login when correct details are provided.
Example:-
//checked if login component rendered correctly.
it('should render correctly ', () => {
wrapper = shallow(<Memory Router>
<Login Component store={store} />
</Memory Router>);
expect (wrapper.getElements()). to MatchSnapshot();
})
Here, we are checking that the login component renders correctly. Also, we are using the shallow rendering method of the Enzyme.
We have used MemoryRouter to mock the router component used. Then we have passed the mocked data to the component and completely provided it the mock environment for testing.
Then we have done the testing of the component using expect. We check that does it matches with the correct snapshot created.
After implementing all the scenarios of login testing, the final output of the npm run test would look like:-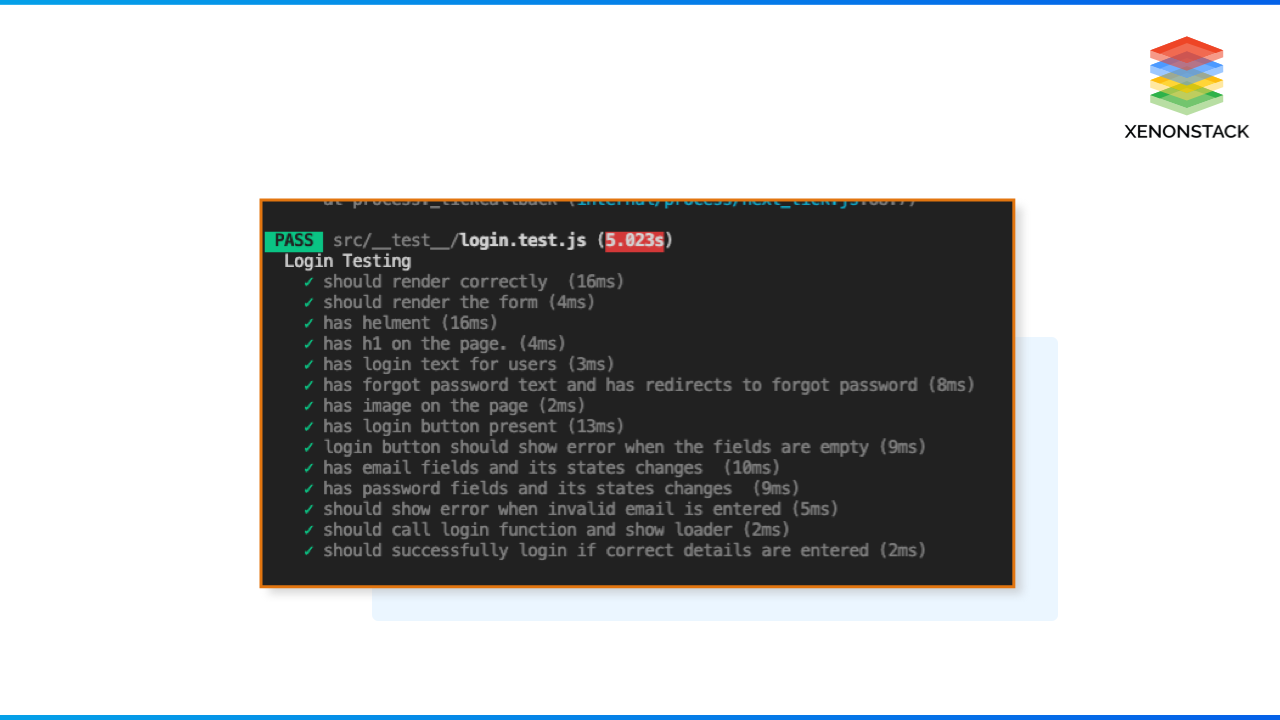
More detailed implementation can be found here with all the scenarios implemented:- Implementation of Enzyme Testing
A process which is used for increasing the quality of a software or a product and for improving it by identifying defects, problems, and errors. Click to explore about, Test Driven Development with React JS and Jest
What are the various methods of implementing Unit Testing in React?
|
React Testing Library |
Jest |
Enzyme |
|
require less started setup |
||
|
Need Jest |
Need Jest |
|
|
Code is short, readable, clean and nice. |
Takes more lines of code. |
|
|
need to specify the cleanup in the testing file. |
clean the renders automatically |
|
|
made from the user perspective. |
||
|
recommend less use the data-test-id in our components. |
insert a lot of data-test-id |
|
|
not a test runner |
test runner |
|
|
can not use react-testing-library without jest or any other test runner eg: Mocha |
can not use Enzyme without jest or any other test runner eg: Mocha |
|
|
React-testing-library (testing library) will help you to perform event and accessing dom element |
enzyme( testing library) will help you to perform event and accessing dom element |
collect all .test.js files execute all the test cases and put the output in console with detail like how many pass and fail |
|
is the alright-weight library that provides light utility functions of react-dom & test-utils which encourages good testing practices |
provides us with access to the state, props, and children components of a React Component here we can also traverse, manipulate, and in some ways simulate runtime given the output. |
|
|
we test using DOM, so there is no shallow or deep rendering present |
Present in enzyme |
|
|
is a library that makes easier testing specific react components it integrates with another library |
is a fully-featured framework where it does just test react components also provides test running scripts that will run on option and as well as the whole library |
|
|
it solves those problems instead of comparing snapshots of render component, Enzyme renders them in memory the provide examined result |
Jest have some integrated tools where it test snapshots |
|
|
React Testing Library doesn’t need another library. In this case we need to install “@testing-library/react“. |
While using Enzyme to test our components this library needs another library “enzyme-adapter-react” |
Conclusion
So, we found that unit testing is compulsory for developers to do. It seems extra work but when it comes to better performance and a great experience for users with fewer bugs, testing becomes compulsory. Following the TDD approach, helps us to find the bugs at an early stage and resolve them. It also helps us to develop faster applications. We saw various methods of unit testing in react, which can be adopted as per our requirements and development. Even many companies add a stage in a pipeline as build. So, it becomes compulsory for each developer to fix the failing test cases after the implementation of the functionality.
- Discover more about User Acceptance Testing
- Click to explore about Test Data Management Tools and its Working


