
.webp?width=1921&height=622&name=usecase-banner%20(1).webp)
Architect BlockChain on Kubernetes
The BlockChain is a distributed database that maintains a continuously growing list of ordered records called blocks. This technology is underlying Bitcoin and other cryptocurrencies. It is a public ledger of all Bitcoin transactions. These blocks are added in chronological order. To deploy a blockchain application, you need a distributed Hyperledger blockchain on your choice of infrastructure (on-premise or cloud). In this article, we will deploy a Hyperledger Fabric cluster using Kubernetes.
Prerequisites for BlockChain Application Deployment
Following this guide requires a system with a working Kubernetes cluster. We will use Fabric, an implementation of blockchain technology written in Golang, so go version go1.6.2 or above is required. Before proceeding further, let’s have a look at Hyperledger Fabric.
The Hyperledger Project
Hyperledger is an open-source project with a collaborative effort created to advance blockchain technology. It helps in cross-industry distributed ledgers which support transaction systems, property transactions, and other services.
Hyperledger Fabric
The Fabric is an implementation of blockchain technology. It provides a modular architecture that allows pluggable implementations of various functions.
Hyperledger Kubernetes Replication Controller
We will launch hyperledger on kubernetes as a Replication Controller, ensuring the high - availability of hyperledger pods. Create a file named members-rc.yml. That’s enough with the replication controller. Now, our next target is to deploy services for the Replication Controller.
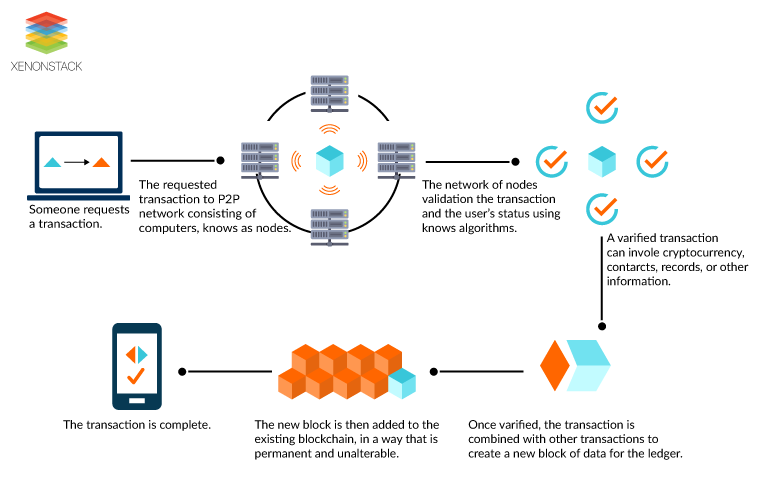
Fig 1.1 Xenonstack distributed payments
Helm is a powerful package manager for Kubernetes that simplifies the deployment process, provides dependency management and versioning capabilities, and offers a flexible templating engine.
Running Hyperledger Pods
After creating all the necessary files, the next step is to start these rc pods $ kubectl create -f members-rc.yml $ kubectl create -f vp0-rc.yml
Running Hyperledger Services for Blockchain Deployment
Now start the service for hyperledger $ kubectl create -f members-srv.yml $ kubectl create -f vp0-srv.yml1. Running the ChainCode
Before running ChainCode, you need to set your $GOPATH and then make a directory to download the sample ChainCode in the src directory. Next, you’ll need to download the Hyperledger fabric to your local $GOPATH; after that, you must build the ChainCode.
Go to the chaincode_example02 directory and build the code.
2. Starting and registering the ChainCode
Run the following command to start the ChainCode. After that, the ChainCode console will display the message “Received REGISTERED, ready for invocations,” which shows that ChainCode is ready for use.
3. Running Rest API
To log in with the help of REST API, send a POST request to the /registrar endpoint with the enrollmentID and enrollmentPW. These parameters are listed in the eca. Users section of the members.yaml file. You can also track the events on the console.
Kubernetes Operators and Frameworks play a crucial role in the deployment and management of blockchain applications on Kubernetes. Operators are software extensions to Kubernetes that enable the automation of complex tasks and operations specific to a particular application or system. They allow you to define, deploy, and manage the lifecycle of your blockchain application using Kubernetes resources.
Setting up HyperLedger Cluster
The below are the steps involved in setting up HyperLedger cluster:
Pulling Images
First, pull the latest images published by the Hyperledger fabric project from DockerHub. docker pull hyperledger/fabric-peer:latest docker pull hyperledger/fabric-membersrvc:latest Now in order to run these images. Create a docker-compose file which will launch both of these services.
membersrvc:
 image: hyperledger / fabric - membersrvc
ports:
 -"7054:7054"
command: membersrvc
vp0:
 image: hyperledger / fabric - peer
ports:
 -"7050:7050" - "7051:7051" - "7053:7053"
environment:
 -CORE_PEER_ADDRESSAUTODETECT = true - CORE_VM_ENDPOINT = unix: ///var/run/docker.sock
 -CORE_LOGGING_LEVEL = DEBUG - CORE_PEER_ID = vp0 - CORE_PEER_PKI_ECA_PADDR = membersrvc: 7054 - CORE_PEER_PKI_TCA_PADDR = membersrvc: 7054 - CORE_PEER_PKI_TLSCA_PADDR = membersrvc: 7054 - CORE_SECURITY_ENABLED = false - CORE_SECURITY_ENROLLID = test_vp0 - CORE_SECURITY_ENROLLSECRET = MwYpmSRjupbT
links:
 -membersrvc
command: sh - c "sleep 5; peer node start --peer-chaincodedev"
That’s it now we are ready to launch these service by simply running docker-compose up
Running the ChainCode
Before running chaincode you need to set your $GOPATH and then make a directory to download the sample chaincode in the src directory.
mkdir - p $GOPATH / src / github.com / chaincode_example02 /
 cd $GOPATH / src / github.com / chaincode_example02
Curl--request GET https: //raw.githubusercontent.com/hyperledger/fabric/master/examples/chaincode/go/chaincode_example02/chaincode_example02.go > chaincode_example02.go
Next, you’ll need to download the Hyperledger fabric to your local $GOPATH, after that you have to build the chaincode.
mkdir - p $GOPATH / src / github.com / hyperledger
cd $GOPATH / src / github.com / hyperledger
git clone http: //gerrit.hyperledger.org/r/fabric
Go to chaincode_example02 directory and build the code
cd $GOPATH / src / github.com / chaincode_example02
go build
Starting And Registering The ChainCode
Run the following command to start the chaincode.
CORE_CHAINCODE_ID_NAME = mycc CORE_PEER_ADDRESS = 0.0 .0 .0: 7051. / chaincode_example02
After that chaincode console will display the message “Received REGISTERED, ready for invocations” which shows that chaincode is ready for use. 
Running Rest API
To log in with the help of REST API, send a POST request to the /registrar endpoint, with the enrollment ID and enrollment PW. These parameters are listed in the eca.users section of the membersrvc.yaml file.
REST Request
POST localhost: 7050 / registrar
{
 "enrollId": "jim",
 "enrollSecret": "6avZQLwcUe9b"
}

REST Response:
 200 OK {
  "OK": "Login successful for user 'jim'."
 }
If try to log in again it should say user already logged in. 
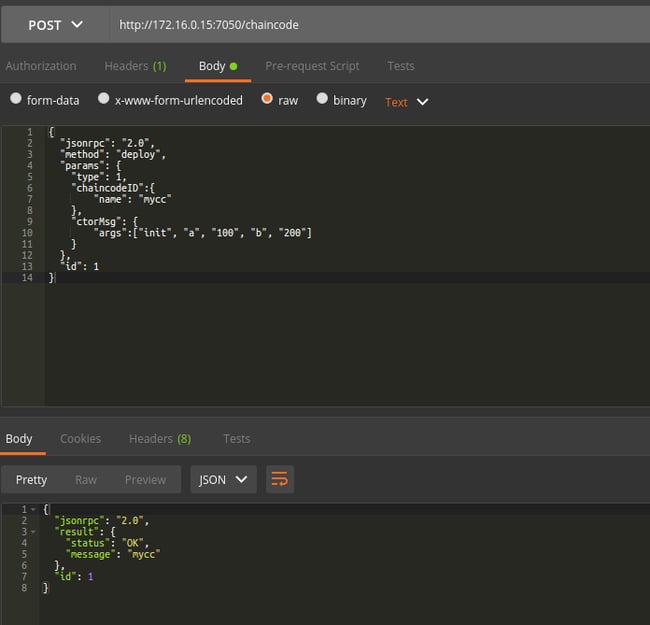
REST Request
POST / chaincode
{
 "jsonrpc": "2.0",
 "method": "deploy",
 "params": {
  "type": 1,
  "chaincodeID": {
   "name": "mycc"
  },
  "ctorMsg": {
   "args": ["init", "a", "100", "b", "200"]
  }
 },
 "id": 1
}
REST Response
{
 "jsonrpc": "2.0",
 "result": {
  "status": "OK",
  "message": "mycc"
 },
 "id": 1
}
 You can also track the events on the console also.
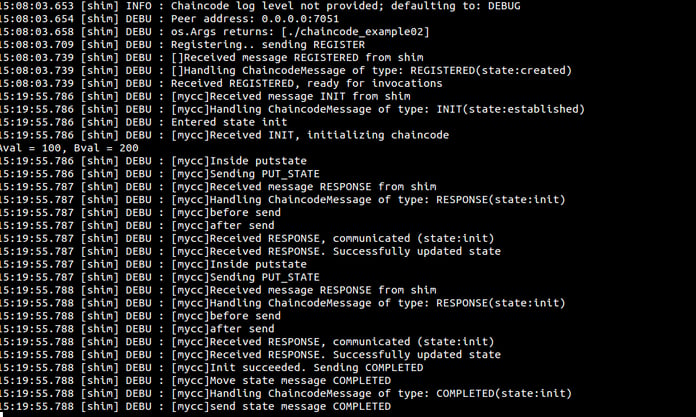

Blockchain brings better efficiency, strengthens trust and transparency with fast & efficient transactions.
Final Thoughts
Blockchains can support the creation of new, more efficient business processes. Now that you understand the fundamentals of BlockChain Technology, you need to decide whether BlockChain fits your needs or not. There will be a rush to develop new decentralized apps to enable the decentralized world we are moving towards.
Considering this fact, Business Leaders need to learn a new vocabulary around crypto-related frameworks. Developers need to learn how to write decentralized apps enabled by BlockChain Technology. End Users need to learn how to create or use smart contracts, e.g., as depicted via the Mist browser vision (Ethereum), a mix of marketplace discovery, management dashboard, and creation platform, in one. You can also explore more about Serverless and Microservices for Blockchain in this blog.


