
.webp?width=1921&height=622&name=usecase-banner%20(1).webp)
Introducing Continuous Integration in Jenkins
Way back, when integration took a longer period, it was exponentially more difficult to find and fix problems. These integration problems lead to the project off-schedule and the failure of the whole project. No wonder there was a need for Java Continuous Integration in Jenkins. Continuous Integration (CI) is the development practice that automates the integration of source code from different developers working on a single software project. It requires developers to integrate code into a shared repository whenever modifications are done in source code.Role of Java Continuous Integration
When talking about Continuous integration, the version control system plays a crucial role. When you are integrating your code frequently, the chances of getting things wrong are significantly less, and you can spend more time building new features. CI allows a software developer to work independently on modifications and features in parallel. After developing code and ready to merge the modified code (new features) to the final product, they can do this independently and fast.Continuous integration is simply a practice that requires developers to integrate code into a shared repository several times a day. Source: Gartner, IncAfter committing a code, the software builds and tests quickly. When developers commit their respective code in a large project many times in a day, the code is committed, built, and tested every time. If test cases are passed, testing of a build for deployment and deployment is a success. The code is pushed to production. Through Continuous Integration Pipeline, many tools are there to monitor, compile, build, and test code, such as:
- Jenkins, TeamCity (Continuous Integration Server)
- GitLab, GitHub (Source Control Tool)
- Maven, ANT, Gradle (Build Tool)
- Selenium (Testing tool)
Jenkins in Brief
Jenkins is an open-source continuous integration tool. Usually, the Java programming language writes this tool. It promotes real-time testing and reporting on isolated changes in a larger codebase. Jenkins helps developers quickly find and solve defects in their code and automate the build and testing of code. Jenkins is so popular because it monitors tasks during the development of the project. For example, if a team is developing a software project, Jenkins will continuously build and test the software and tell about the early stages.Scenario before Jenkins:
- Once all developers had completed their code, they used to commit their code simultaneously when working as a software development team, then build tested and deployed.
- Finding and fixing those errors from multiple commits is not an easy task in this type of situation.
- All the building and testing process is manual, increasing the chances of failure leading to a prolonged development cycle.
Scenario after Jenkins:
- As soon as the developer commits the code, the building and testing process starts right away. Jenkins builds and tests the code many times in the day.
- If any failure occurs during the build phase, Jenkins will notify the developer about the developer's error. When the build process is successful, Jenkins will deploy it directly to the test server and inform the deployment team.
- If any developer commits the code, there is no need to wait for other developers to commit it. With this, it is easy to detect the errors from a single code push.
- Jenkins provides an automated way to build and test the application, which saves a lot of time. Through this, the development cycle has become fast and less error-prone.
Guide to Add a Simple Java Program in Jenkins
Shown below is a brief yet complete guide to operating a Java Program in Jenkins. Know the step-by-step processes below. Prerequisites:- Java JDK or JRE installed on a machine because Jenkins required JDK to run.
- Jenkins should be installed on your machine.
- A GitHub account for code integration from a shared repository.
 Now enter your username and password, which you make during installation time. Step 2: Now, you see the dashboard of Jenkins, Select New Item from the sidebar, enter the name of your project, then select Freestyle project, and click Ok.
  Step 3: After this, you see so many options to fill, but now you add your Git repository here. Select Source Code Management and click on Git, then add your repo link here.
 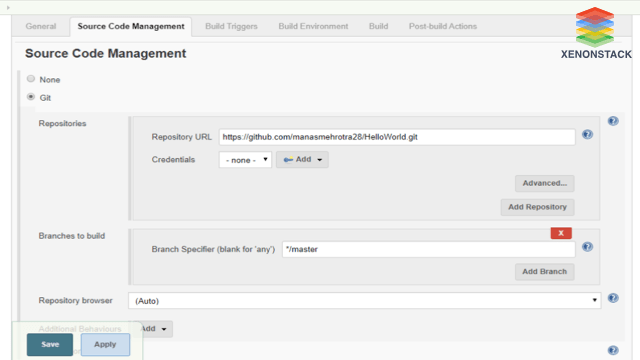 Step 4: Now, next, the build trigger is used to run your build process. There are many options, but we are selecting GitHub hook trigger for GITScm polling means every time you commit your code on GitHub, your build is triggered. And then select Build to Add build step; if you are on windows, select Execute Windows batch command; otherwise, Execute shell (For Linux or macOS) and then add the command for executing your code.
- javac Demo.java
- java Demo


